1. Bouldering Guidebook
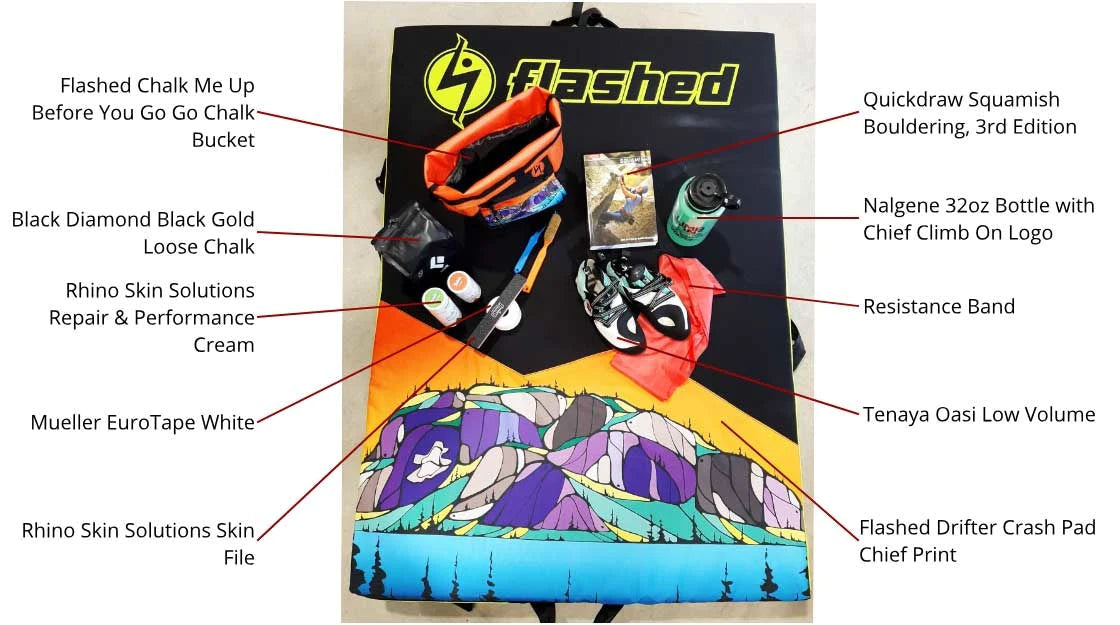
The Squamish forest hides thousands of boulders — some are just steps away from the trailhead, while others are harder to locate. Once you arrive at your destination, deciphering where to start and where to exit a problem is, in itself, often confusing. The bouldering guidebook is an essential piece of kit, whether you are looking to put up new lines or seek out a bouldering area to warm up in. We recommend writing your name and phone number on the front of the book because this book is often left lying in the dirt when you pack up at the end of the day.
Many guidebooks also have an empty box after each problem. This has been left deliberately blank, so as you 'tick off' problems you can also check them off in your book. Some guidebooks, including Squamish Bouldering, 4th Edition, feature a Top 100 list highlighting the best problems across all grades. Completing all 100 problems is considered a true test of mastery of the Squamish boulders.
The book also contains some subtle warnings next to each problem. For instance, if you see a 'ghost' symbol be prepared to be scared — this could hint that the boulder problem is really high or the route has some nasty landing zones. If you see a 'forearm' symbol be prepared to be pumped. The individual moves of a boulder problem might not be as hard as its given Grade, but the "pump factor" will drain your strength. All in all, the bouldering guidebook helps plan out your circuit for tomorrow and makes for a great coffee table read.
2. Crash Pad
Without a crash pad, the Squamish forest will make for treacherous landings. Owning your own pad is just the start. Often, landings will require multiple pads and highballs may require you to round up every friend and every pad they own. Check out this Squamish Bouldering Video, which shows the number of pads used during a "highball day" a few years back. Don’t own a crash pad or want to travel to Squamish without the hassle of carrying one? Climb On rents crash pads.
Squamish has notoriously bad landings, so even the relatively low problems may require 2 or 3 pads to fill in those gaping holes and to cover all the many "landing zones". Pads come in a variety of sizes, thickness and densities, and the art of pad placement takes time to learn. If you are joining a group, be sure to offer your pad to help build a safe landing zone for everyone.
Finally, boulder pads serve as a perfect place to clean your shoes, take a lunch break and stuff all your other essentials inside them when heading out for the day. To learn about pads in more detail, check out our Crash Pad Gear Guide!
3. Water and Snacks
High intensity exercises, like bouldering, use blood glucose as the main energy substrates for muscle contraction. If you expect to be able to "crank out" at your max power all day, you will need to refuel and take breaks. Unlike the gym, it's normal to take longer breaks and refuel between trying problems. We have found that it is best to snack regularly while bouldering to maintain a high level of blood glucose for the entire climbing session. This works better than having a large meal before bouldering or not eating at all.
While the physical excursion of bouldering will not reduce you to a dripping sweat, it will still use water from within your system. In the winter, you can stay hydrated by drinking warm tea, but during the humid summer months you will become dehydrated just from spending a day in the muggy forest, pulling on tiny crimps. Depleted muscles don't make you perform well, so stay hydrated!
4. Warm-up Equipment
Bouldering is all about maximum effort, the smallest holds, the steepest lines and the funkiest movement. Unfortunately, the downside of this is injuries. Every bouldering group you meet will have someone recovering from a torn finger pulley, an injured shoulder or just recovering from over-exertion. The local physiotherapist ply a roaring trade in treating injured climbers and unlike other sports, a warm-up for bouldering can often be just a few moves before hopping onto a maximum effort problem. We recommend using a warm-up fingerboard, resistance bands, forearm trainers, grip savers or a plethora of Portable Training Equipment. Experts recommend raising your heart rate and doing some easy moves before you start trying hard boulder problems. This may seem excessive, but it will help you stay injury-free when bouldering.
5. Bouldering Shoes
Your bouldering shoes is the one item that never gets left behind. The weapon of choice for a boulderer is a very personal decision. Everyone will have a different preference for fit, rubber, aggressive downturn, stiffness, heel cup and closure system. We selected 6 of the best shoes for bouldering and reviewed them in detail for you. Head over to our Shoe Review for a complete read.
We recommend marking your shoes, so you don't mix them up with an identical looking pair that's a half-size smaller from your bouldering buddy. Also, shoes will eventually deteriorate, but there are a few tricks you can use to prolong the life of your investment.
- Dry your shoes between use. Do not store them in your cold damp car; they will rot and stink.
- Use Tension Shoe Spray to revive the tackiness of your shoes, allowing you to stick better to footholds.
- Be aware of dragging your lower foot up the wall as you rock over a hold. This constant action will destroy the front of your shoes.
- Use a shoe deoderizer such as Sole Spray between gym sessions; this will get rid of the dreaded foot odour.
-
Resole your shoes before wearing through the rand.
We recommend using a manufacturer authorized cobbler to ensure the highest quality workmanship. That said, nothing will perform as well as a brand new pair of shoes. If you have trouble finding the perfect shoe, check out our Climbing Shoe Fit Guide to learn all that there is to know about climbing shoes.
6. Chalk Bucket with Chalk and Brushes
Chalk Bucket
While a regular chalk bag needs refilling, a Chalk Bucket can hold an entire 11oz bag of loose chalk. With this much chalk, you will be ready for multiple days of bouldering. Your chalk bucket is not only storage for your loose chalk, but it's also great for carrying multiple chalk brushes, a skin file, your liquid chalk and your car keys. Best of all, it stands up whereas a regular chalk bag sits sideways on the ground, ready to be spilled by the wagging tail of a passing dog. As a bonus, a bucket closes tightly so it won't pour into your pack at the end of the day.
Chalk
Squamish is notorious for humidity. The hardest problems in the forest cannot be climbed when the granite feels greasy and slippery. The humid air makes your skin damp and makes you hold onto the rock even harder. That's when you use chalk to help keep your hands dry. But, not all chalk is the same. Some contain drying agents, some are more "pure" and some have hyper absorption qualities. Make sure you select the chalk best suited for your skin and the weather conditions.
Chalk Brush
All that chalk has to go somewhere! The smallest grooves and dimples in the granite grab at your skin allowing you to grip the rock. Using chalk dries your hands, but it will also end up in those tiny gaps! Remember to brush the hold before your next try, since this may be the difference between success or failure. We recommend that you equip yourself with a good quality boar hair brush to clean up those chalk-filled holds.
7. Skin Maintenance
Maintaining your skin is as important as a chef keeping his knives sharp! File away that dead, calloused skin to keep your hands supple and to keep an even skin thickness. Wash your hands after climbing and apply recovery cream (such as Rhino Repair); this will help your skin rebound better for your next climbing day.
The secret that has been around for over ten years is a chemical called Methenamine. This chemical reduces sweating and toughens your skin; it can be found in some of the Rhino Skin products at various intensities and also in Antihydral Cream in its most concentrated form (Be warned, Antihydral is an extreme, skin drying agent). The Rhino Performance contains Methenamine, but at a lower dose, and combined with natural ingredients. It can help heal your skin faster, can be applied multiple days in a row and can prolong an individual climbing session, as well as the number of days you can climb in a row. Have a skin routine suited to your skin type. If in doubt, check out our Skin Care Guide, for more detailed tips on how to take care of your skin!
8. Tape
Injuries happen, which can be as minor as a skin tear or a finger joint sprain. Tape is one of the ways you can patch yourself up in the field and keep climbing. Pop a roll into your chalk bucket and you will end up fixing jackets, tears in crash pads, as well as that odd flapper.


Leave a comment